Thursday Technicalities: Pinterest for Authors

Ariel Paiement

Introduction

We’re taking a break from our discussions on publishing to talk about Pinterest today. Mainly, the focus will be on Pinterest for authors. This was a request for a guest post over on the Burning Embers blog. It’s up over there today as well, so check their blog out. They’ve got lots of useful tips for authors and writers. Their topic this month is marketing for authors. Let’s get started!

I’ve talked to quite a few of author friends who are sitting in front of their computers hemming and hawing about whether or not they need to be using Pinterest. If that’s you too, let me make this super easy! I mean no offense to anyone by saying this, but you should be using it! No two ways about it, you should. If you aren’t, especially as an author who has plenty of graphics and covers that would fit right in on the platform, you’re missing out. 

But, Ariel, you might think. I have no time to add another social media platform. And if that’s you, you’re in good company. You’re also in good company if any of the following excuses have crossed your mind in reference to Pinterest:

1) I don’t know what to post.

2) I don’t know how to use the platform.

3) It’s social media, and I really dislike using that any more than I have to.

4) It’s time consuming and maybe it costs something? 

5) Any other excuses to procrastinate. I’m sure someone else has also thought of them even if I haven’t.

Answers to the Questions and Reasons Why Not

Okay, the sarcasm and joking aside, I get that people have a million reasons not to start using Pinterest for their business. But let me answer some of those concerns right up front before we dive into how to get started, what you can do, and what you need to be doing.

1) I don’t know what to post. Well, by the end of this post, you’ll have some great ideas for things you can do, so this will no longer be a problem.

2) I don’t know how to use the platform. Also not going to be a problem when we’re finished here.

3) It’s social media, and I really hate using that more than I have to. False. It is actually a search engine, not social media, and you get to use it for free along with all the analytics tools that come with search engine optimization (SEO) on the site for free! Yup, you can stare at the pretty line graphs and see your traffic go up and down, see your viewer demographics, and track link clicks and so on. But I’m getting ahead of myself. My point is, this is not social media, and you should not be treating it as such. If you do, you’re shooting yourself in the foot from the start.

4) It’s time consuming, and maybe it costs something? No, it is not time-consuming. I mean, sure, it’s going to take you some time if you choose to go the entirely free route because you’ll have to manually upload the post, but it takes maybe five minutes tops once you know what you’re doing, so that’s less time than it takes to write the average blog post or even some Facebook posts. You could do it on your lunch break. As for costing something, it doesn’t if you’re not paying for ads and you post your own content. And, most importantly, it is not pay-to-play like so many other sites, so you can still build traffic and succeed without paid advertisements if you’re smart.

5) Any other excuses you can come up with? Since I don’t know them, I can’t guarantee I’ll give you a reason not to procrastinate, but by the end of this post, I’m hoping you’ll be fully convinced that you should be doing Pinterest even if you’re not doing much in the way of other social media.

Who is Pinterest For?

Let’s start with this. Who’s on Pinterest? Well, hopefully your ideal reader. But let’s just break it down to something simpler. Lots of people are on Pinterest. Varying age groups are on at different times during the day, and they’re all looking for different things. But mainly, Pinterest attracts people who are doing a few things:

1) Shopping around to figure out what they want to buy for any given type of product (decor, books, electronics, you name it)

2) Looking for amusement because they’re bored (so maybe they’re looking at humor, book reviews, DIYs, or memes)

3) Looking for information (They want to know about something or how to do something, and they’re looking for free blog articles or graphics explaining how)

4) Needing inspiration for a project (painting a new room, decorating their house, planning a wedding, writing a book, and anything else under the sun)

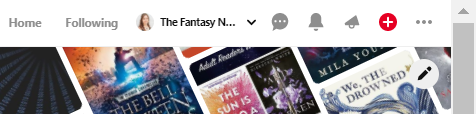
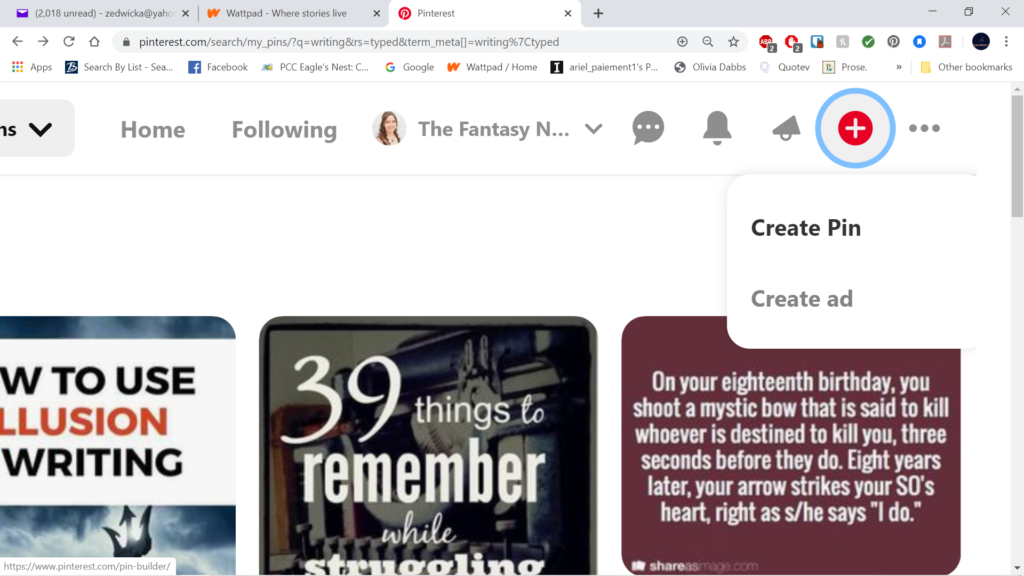
Why is Pinterest great for these? Because it’s a search engine in a visual form. People see Pins, which is just another word for visual search results created by Pinterest’s content creators (aka me and, hopefully, you too soon). If they look under the Pin, they see the title and maybe some basic information. Let’s take a look:

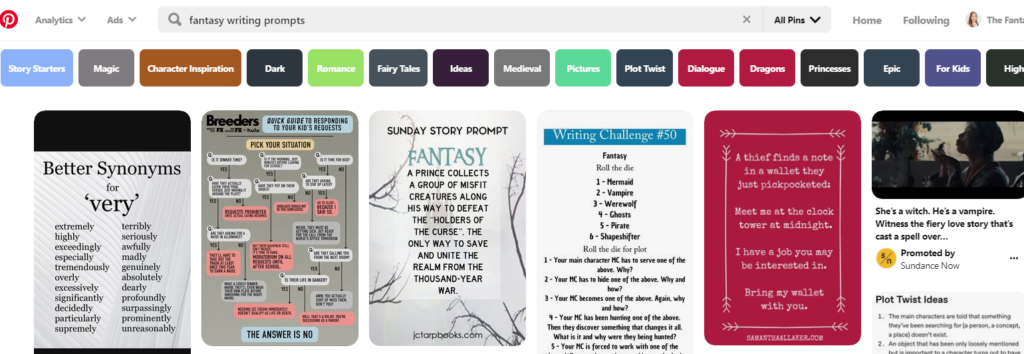
I’m a fantasy writer, so I looked up fantasy writing prompts. The image above shows all of the results that fit into the screenshot when I took it. Notice that some have titles while others don’t, but all of them have some kind of visual that lets you know what it is. You shouldn’t need the title to figure out what you’re looking at in most cases. So if I’m looking for inspiration for a project, for example, maybe I choose the third result: Sunday Story Prompt. 

Now that you understand who is on Pinterest and why, let’s move on to understanding how people move through the site and how you can use it to gain traction for your blog!

Understanding the Site Layout

You’ve already seen how to search for things in that first screenshot, and we talked a little about why it’s such a useful way to search. Your viewers can figure out if your content is something interesting to them without even reading the header in many cases. Not that you don’t put a header in, since that helps to improve search results and pop your Pin to the top of the results page when certain keywords are hit. But they shouldn’t need it to have a general idea of what the Pin is and to be drawn to looking at the Pin further.

So once someone has clicked on your search result, what do they see? I clicked on the Sunday Story Prompt result I mentioned earlier, and here’s what I get.

Pin

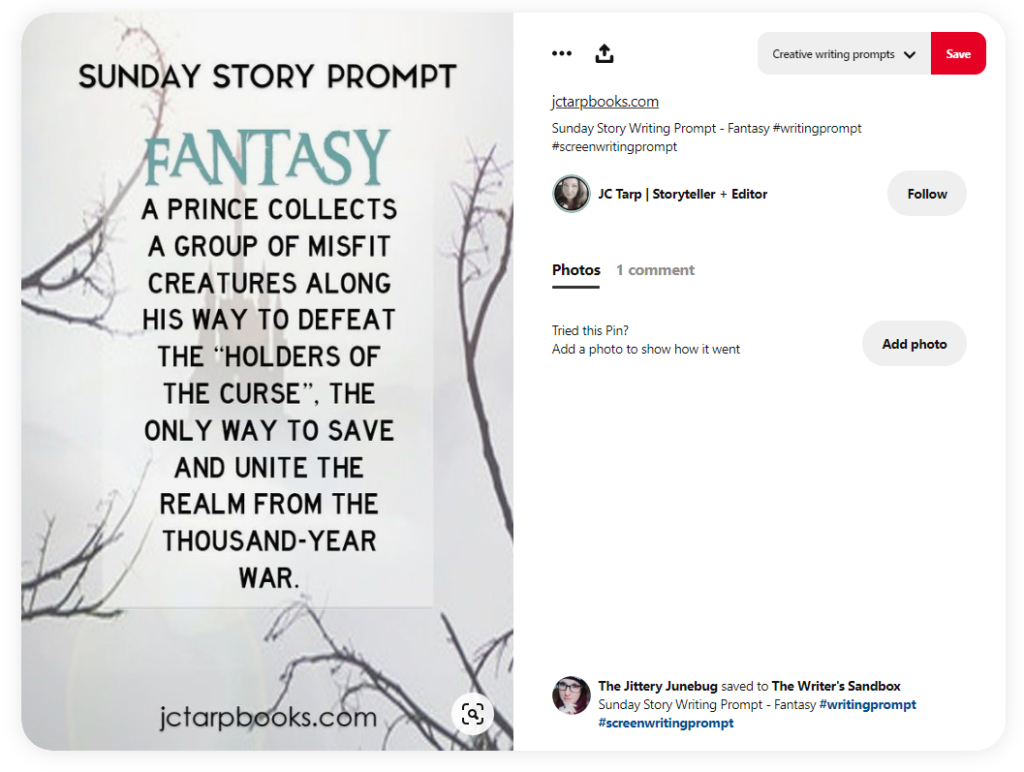
Now, notice that this individual didn’t give the Pin a title. Generally, that’s not the best because as a search engine, Pinterest is going to use your title and description to show your Pin to Pinners searching for content using your keywords. So don’t skip the title. If the Pin has a title, you can see that here:

Description and Title on Pinterest

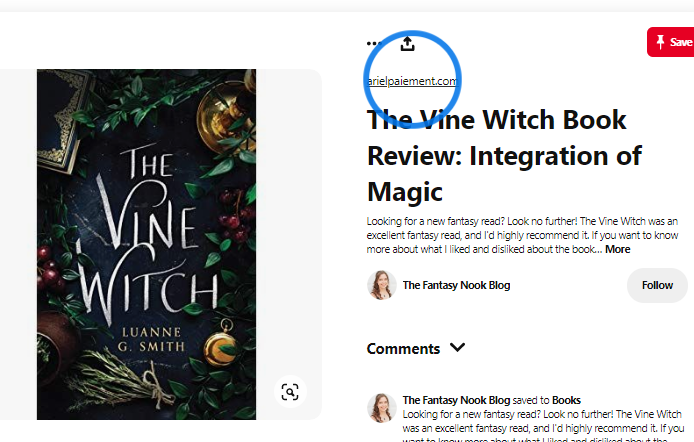
Notice that now you see both the website link and the title of the Pin above the description. The title is the first thing a Pinner sees, and if that isn’t what they were expecting, they might still Pin the content since the image appeals, but they’re probably not going to click the link to go to your blog (which is what you want them to do since Pinterest is meant to be a funnel, not just a fun toy to amuse yourself when you’re bored, right?).

And After the Title?

After they see the title, if that’s still interesting, they’re probably going to look at the description. If the Pin is for an actual blog post, then you should describe what the post will do for them and how it can help them. Include a brief explanation of that and then a call to action (if you’re sharing a product or asking them to do something specific). If you’re not selling a product (Which I recommend you don’t, typically, since Pinners aren’t interested–yet–in buying anything. They’re converted to buyers once they leave the platform, like what they see, and check out what else is available from the Pinner they are looking at.), then your call to action might just be, click the link to learn more on my blog. Super simple.

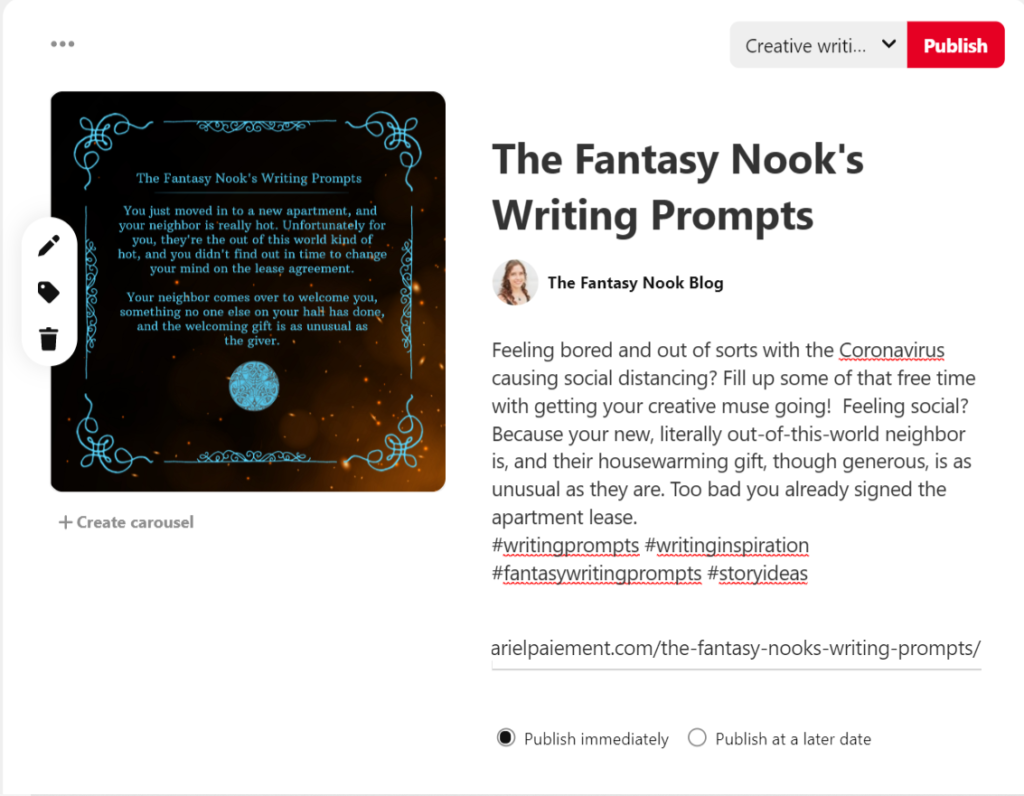
So, this is what one of my descriptions looks like. This one has no particular call to action since the Pin itself is really not intended to specifically do anything beyond what the graphic provides. If your Pin is like that (we’ll talk about why you might have Pins like this), you can do something like this.

Titling Pinterest Posts

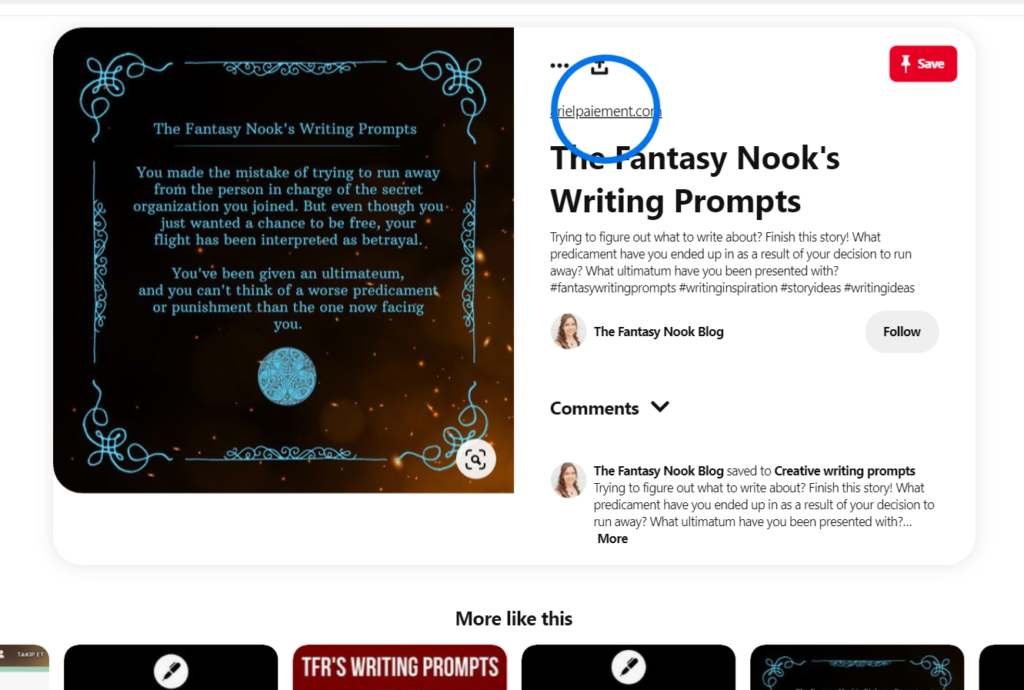
Notice that this includes a few questions to add on to the content I provided in the original prompt. (Ignore the blue circle. My personal account just wants me to click on the link. Pinterest will encourage viewers to do that with outbound links sometimes if they’re newer accounts. My personal one is because I originally converted my personal account to business when I started this. I’ll explain that later on.)

Anyway, the questions I provide ask them if they’re in a predicament of sorts. Then I provide the solution by saying, hey, you’ve got a prompt here, so finish the story. This has in the past gotten me engagement on the Pin in the comments, but not always. Regardless, that’s my call to action. If readers like that, then they’re going to keep reading and, in another situation, may choose to go read the blog article. In some cases, even with Pins of this nature, you’ll get visitors to your blog anyway. I actually do quite often on these Pins in comparison to others.

Pinning It

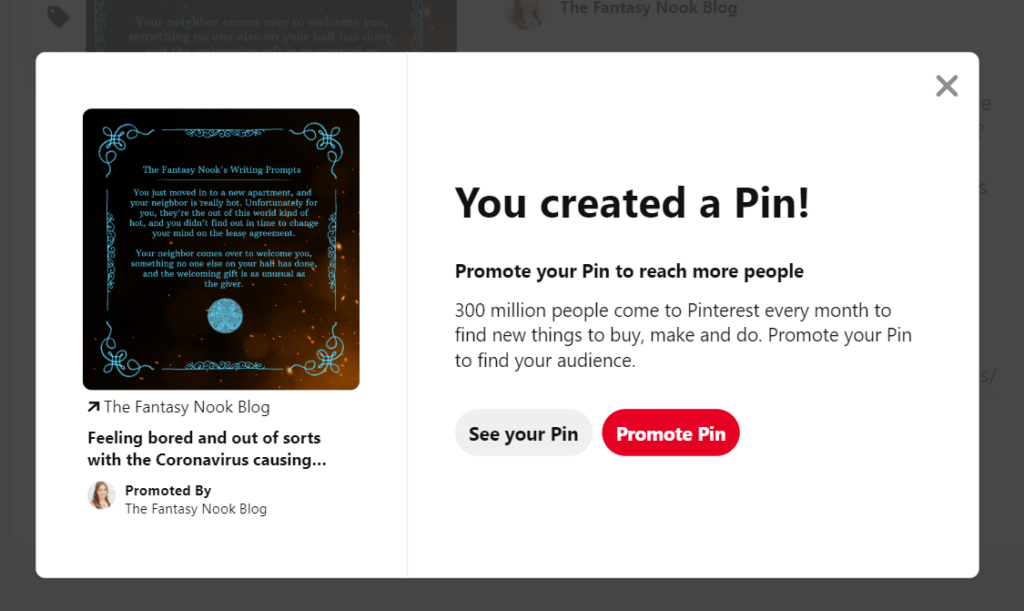
Last point before we move to the next section of the article! Once they’ve decided they like the content, user can choose to Pin it. You can see below that clicking the save button will give them options to save it to Boards. This is kind of like saving things to different folders in your bookmarks but more visual since the Boards will display a certain number of the most recent Pin images saved to that Board. Quite handy if you want an idea of what was saved to it beyond just the title.

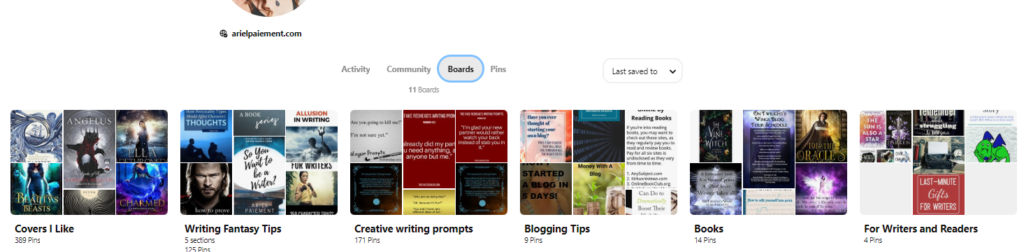
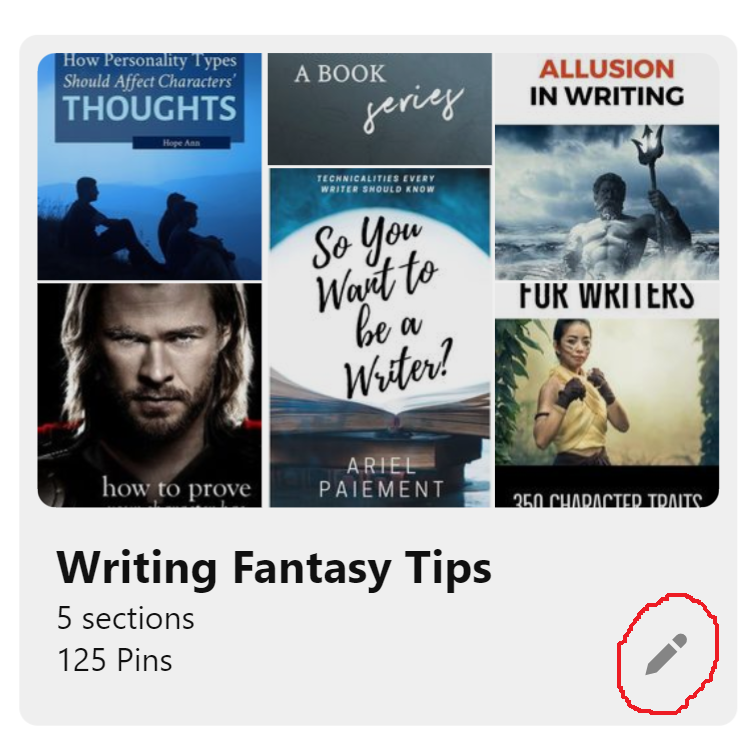
Here’s what some of my author’s Boards look like.

My Pinterest Boards

I’m explaining all this in case you’ve never used the site because you’re going to end up doing some of the same things your potential readers and followers will do. You’ll have to start off from scratch, and that means pinning other people’s content more often than your own to begin gaining traction. Fortunately, it’s far easier to do that on Pinterest than any social media site because a Pin’s lifetime is up to two years instead of the two-or-three-hour lifetime of most social media postings. So, hey, there’s a reason right there to start using Pinterest. You don’t have to spend as much time posting and monitoring, and pinning other people’s content is even easier than creating your own.

Why Business Pinterest?

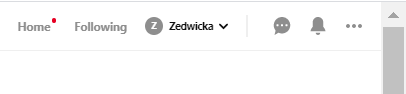
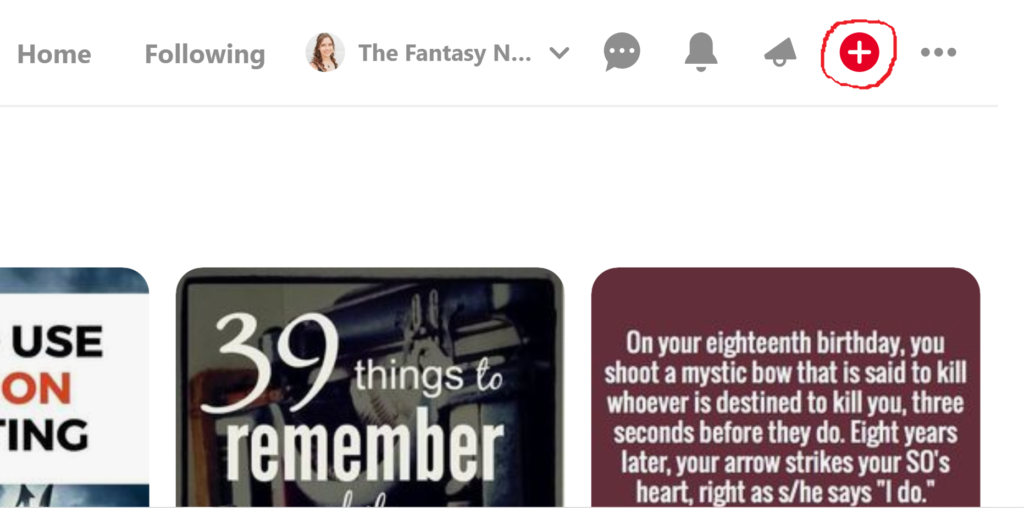
Now that you understand the site’s layout and have a general idea of how people move through the site, let’s talk about your author’s or blogger’s Pinterest account. First off, if you already have an account, you can’t just use your personal account. You need a business account to access the analytics, create your own pins, view stats on the pins, and to connect your website. As you can see, my personal Pinterest account is missing quite a few options that my business account has. I’ve got a red plus sign for creating pins on my business account in addition to an announcements section to see what fans are saying on my pins.

Business Pinterest
Personal Pinterest

So, bottom line, your blog needs a business account. You can do that one of two ways. Either you can convert your personal account to a business account (free of charge regardless of which way you go) and then take down any boards you created on the personal account that don’t relate to your business or your blog (so go into the board’s settings and turn it to private. We’ll go over that in a bit.) or you can create a whole new account and simply choose business instead of personal.

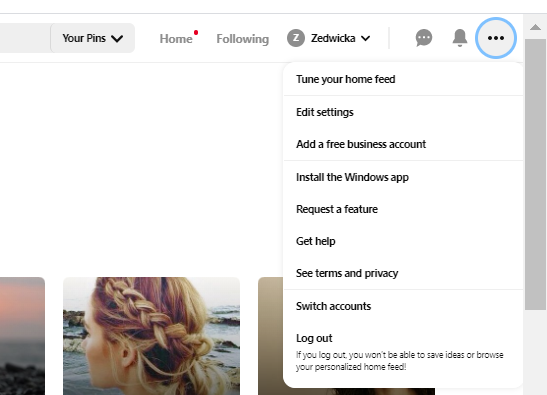
Notice that in the image below, I’m on my personal account and am given the option to add a business account under settings and Account Settings. It’s near the bottom of the screen. That’s where you’d go to convert your own account to a business account.

Pinterest Business
Creating Pinterest Business Account

Claiming Your Website and Socials on Pinterest

Once you have that set up, you need to claim your website and any social media links you may have. I’ll show you where to go for this, but note that if you’re not a techy sort of person, you’ll want to get your host site to help you get the two sites connected. I had to get help when I wasn’t self-hosted because WordPress.com is difficult and I couldn’t find what I needed.

Otherwise, Pinterest has an article on it as do other bloggers on the web, and it’s pretty simple to figure out if you follow the steps. If you have issues, you can always reach out to your website host or Pinterest to get someone to walk you through it if you can’t get it working. I’m always having to do that for new features on my blog and site, and I’m sure I drive the support teams nuts when they see my name and the newest problem, but hey… I’m nice about it, and that’s why they’re there.

To claim your site and social media links, you should go to edit settings and then to claim, which is just below the account settings tab where you switched your personal account over to a business account. Here, you’ll see slightly different options for business accounts. It should look like this:

Pinterest Claim Page

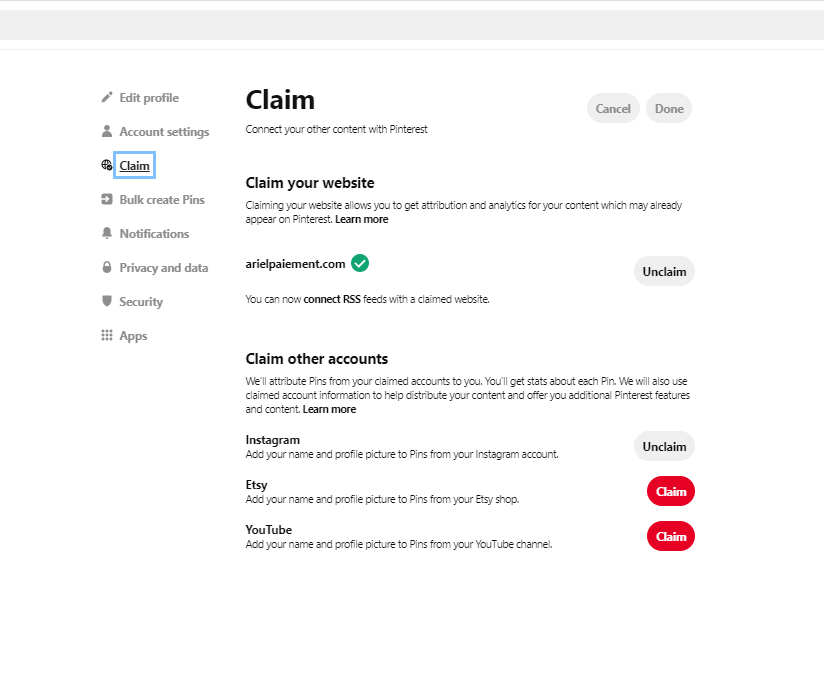
Notice that I already claimed my website and my Instagram. I don’t use Etsy at all or YouTube (often), so neither of those accounts are connected. But you can connect any of those platforms or social media accounts if you need to. I won’t go into detail on this because Pinterest’s help article on it explains far better than I can.

Secret Boards

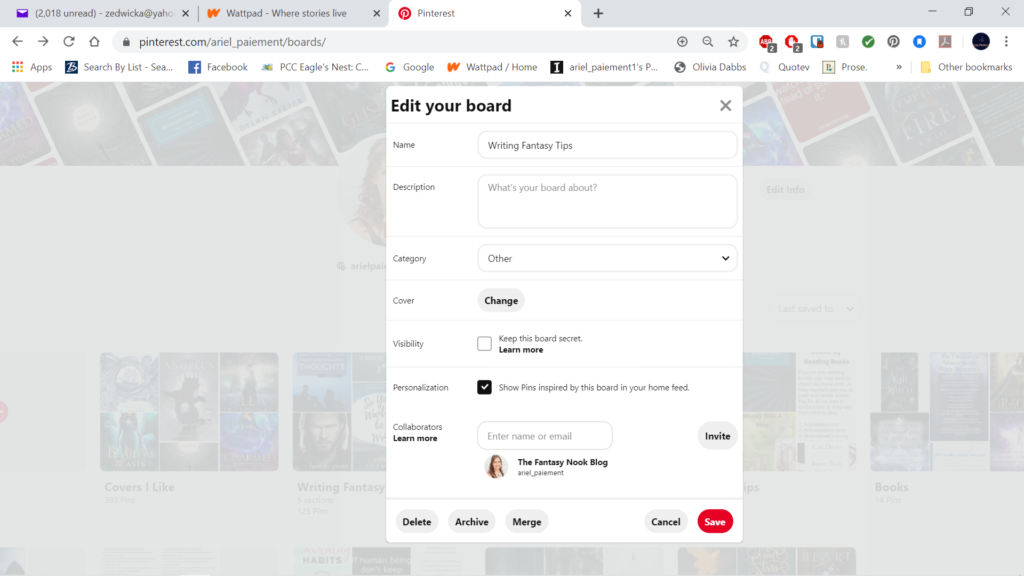
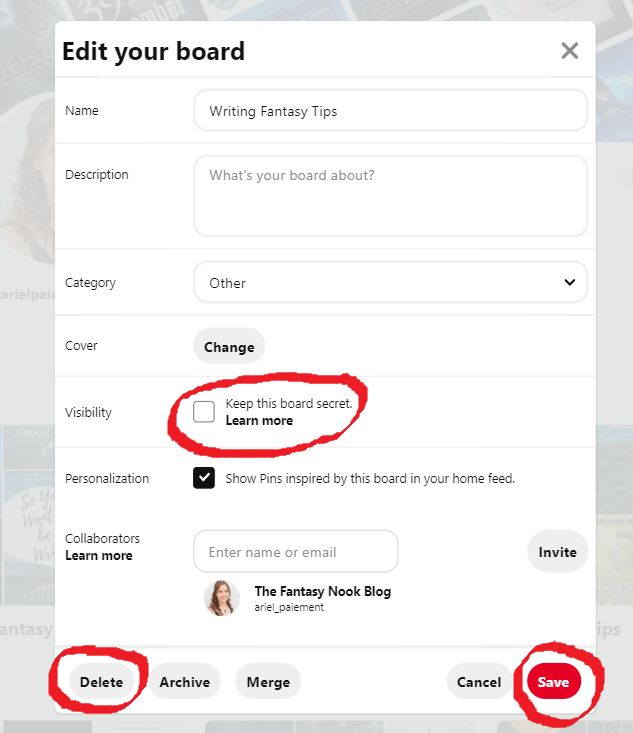
Once you have your account moved over to business on Pinterest, you need to go through your boards and delete or hide any that don’t relate to your blog and business. To be an effective funnel for traffic, your account needs to be attracting only those who will actually find your blog, business, and product useful or desirable. Keeping only boards relevant to your business will ensure that Pinners do some self-selecting on which category they fall under.

To turn a board to secret or delete it, just go to the board settings and select one of the two then save or confirm. You can use the images below to help you find where to do that if you’re new to Pinterest and haven’t edited a board before. I chose to show the steps on my Writing Fantasy Tips board. You can either delete at the bottom or, under Visibility, check the box to keep the board secret if you still want to use it but don’t want others seeing it. I’ve used this for quite a few of my own personal boards. Just make sure you save if you decide to use visibility settings to hide it. I should also note that this is all done from your profile under the Boards tab that I showed earlier.

Pinterest Board
Making Boards Secret
Secret Boards on Pinterest

So, now that the account is set up, how do you use it? What do you Pin and how do you create your own content? Glad you asked! That’s what we’re going to discuss next!

What to Pin

To put it simply, both your content and that of others. But I’m going to talk about content creation a bit later, so let’s focus on what to Pin from others. As stated earlier, every Pin should reflect your brand and business. As an author, there are a few directions you can go.

Start With Your Approach

I’ll explain what I have chosen to do just to give an example, but you should do what fits your blog’s focus and your business’s brand. Every author has a slightly different approach and branding they’re trying to stick to. My way isn’t the only way!’

The Fantasy Nook is focused on providing quality content for readers and authors. My goal has been to establish myself as an expert in the market for writing and editing, especially for fantasy in particular, by providing quality educational material for writers and authors but also by providing reliable book reviews for readers. I also share short flash fiction pieces to demonstrate that I know how to use what I preach.

All of this is aimed at establishing in my viewers’ minds that I am a credible source with a high level of skill and expertise in the field.

How Pinterest Ties In

With that explained, how does my Pinterest account show that? Well, it focuses on writers and readers both, and it has both repined and original content that centers around book reviews, book-related stuff, editing, blogging, and writing in one fashion or another. It’s a mix of fun stuff like writing prompts and reviews to more educational and resource-based materials.

This draws people in because it offers them something that helps them. In our most recent generations, people buy things advertised or placed in front of them for one or more of the following reasons:

  1. They’re convinced they need it.
  2. It’s not too expensive, and it’s an impulse buy.
  3. It makes them feel good because it supports a cause they like.
  4. It’s interesting, and they want it.
  5. It fulfills some area of their life that they already needed help with.

Focusing In

Younger generations in particular focus heavily on what they get out of it. They’re not terribly interested in reason 3, but if it’s one of the other reasons, then heck yeah! They’re all about that. Reason 2 is iffy depending on the person, obviously, but in general, your millennials (to some degree) and your Gen X (to a very high degree) are very concerned with what you’re giving them. Self-centered? Absolutely. But hey, it is what it is. And in a business world, unfortunately, you’re not going to go anywhere if you don’t pander to the way people think and advertise accordingly. Prove to them that they can use it and can’t live without it, and you’ve got a new customer, hopefully permanently.

For authors, it’s much more focused on proving to this group that your book or story is going to entertain them better than something else or another book. Daunting prospect, but really, it comes down to getting your product in front of them and grabbing their attention. This group will impulse buy, depending on the person, and ebooks—even ones in the 2-3 dollar range—aren’t terribly expensive. Less than a coffee at Starbucks, and it lasts a lot longer. So for you, your goal with Pinterest should be to get them to do the following:

  1. Click on the Pin and then the blog link
  2. Get interested in your content
  3. See your book
  4. Find it interesting
  5. Buy the book not the coffee

Obviously, your blog itself plays a direct role once they’re off Pinterest, but that’s not the focus for today’s article. At the end of the day, figure out your goals and the image you’re going for in your brand and marketing, then go Pin accordingly.

Creating Your Own Content

Elements of Creation – Examples

Pinterest is a visual platform, so your content needs to be some sort of graphic that lets others know what the Pin is about even without clicking. If they don’t know what it is, they’ll keep scrolling. That means engaging images, bold and clear fonts, colors that work well together and grab the eye, and a clear representation of the main idea. Let’s look at a few Pins to see how to do that well and what you should think about.

Pinterest Search

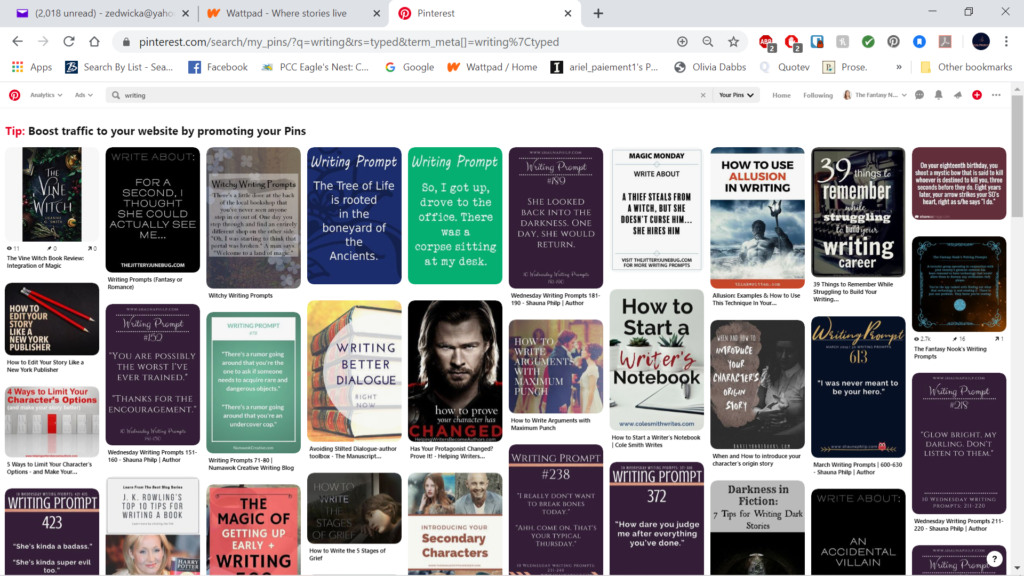
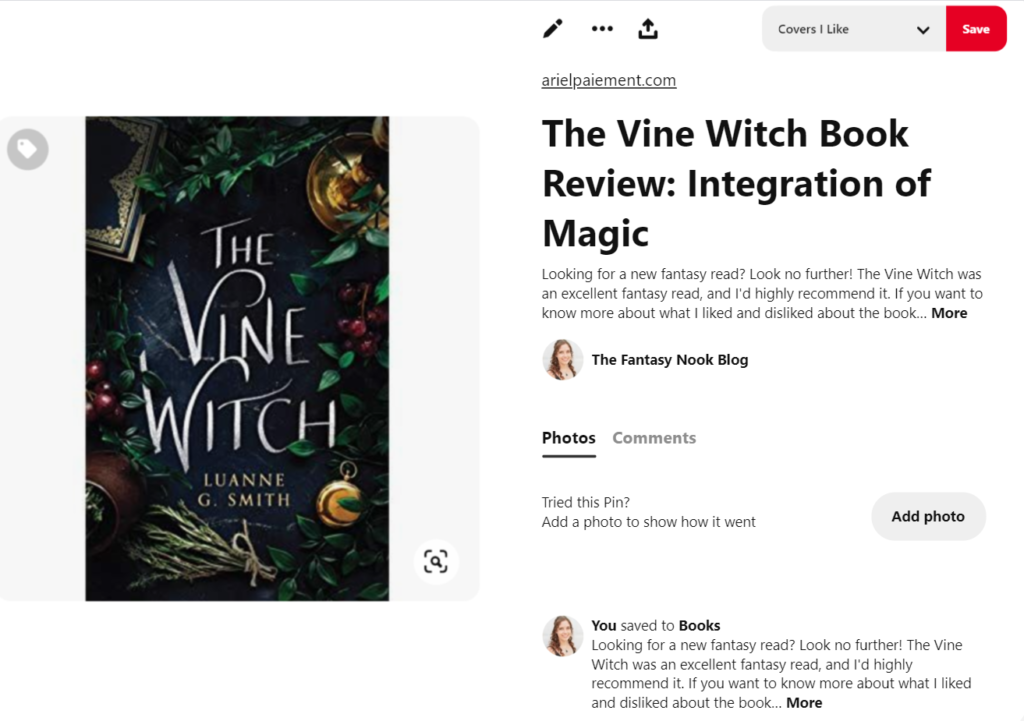
To start off, take a look at these search results. The image is small, but some results stand out better than others. For example, the font on the cover in the first search result is still fairly readable even though it’s small. This was actually one of my book reviews. I didn’t know it would pop up, but it’s the only good cover example here, so let’s use it. For reviews, I only post covers, typically without any sort of other title over the top. I’m trying to highlight the book, not necessarily just a post. Covers are more difficult to see sometimes on small screenshots, but they’re easy to see and admire on a phone or even on a computer, though most people will browse on a phone or other mobile device like tablets and ipads.

Pinterest Art

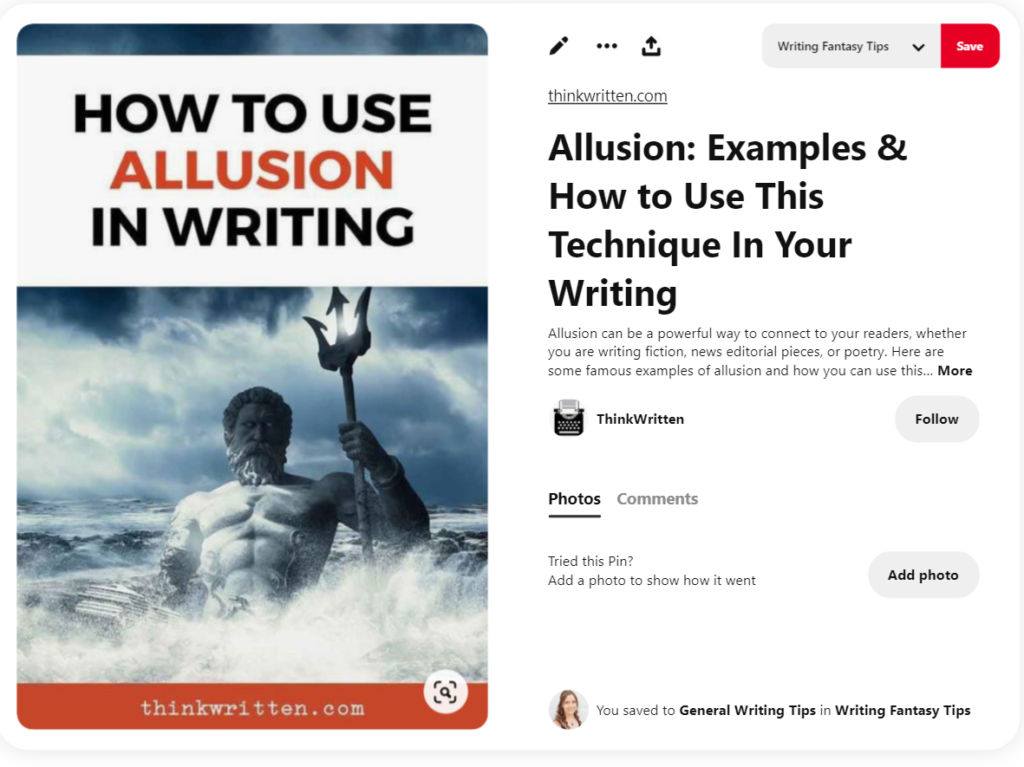
The next pin to stand out is the one with orange, blue, and white as its color scheme. You should quickly see the one I’m talking about. It has a big font and can be read even on this small screen. The Pin’s title on the graphic is How to Use Allusion in Writing. It’s a good example of using brighter colors to draw the eye, and it has pretty decent contrast. Maybe it’s not as pretty as it could be, but it does the job, and the colors don’t clash.

Pinterest Art

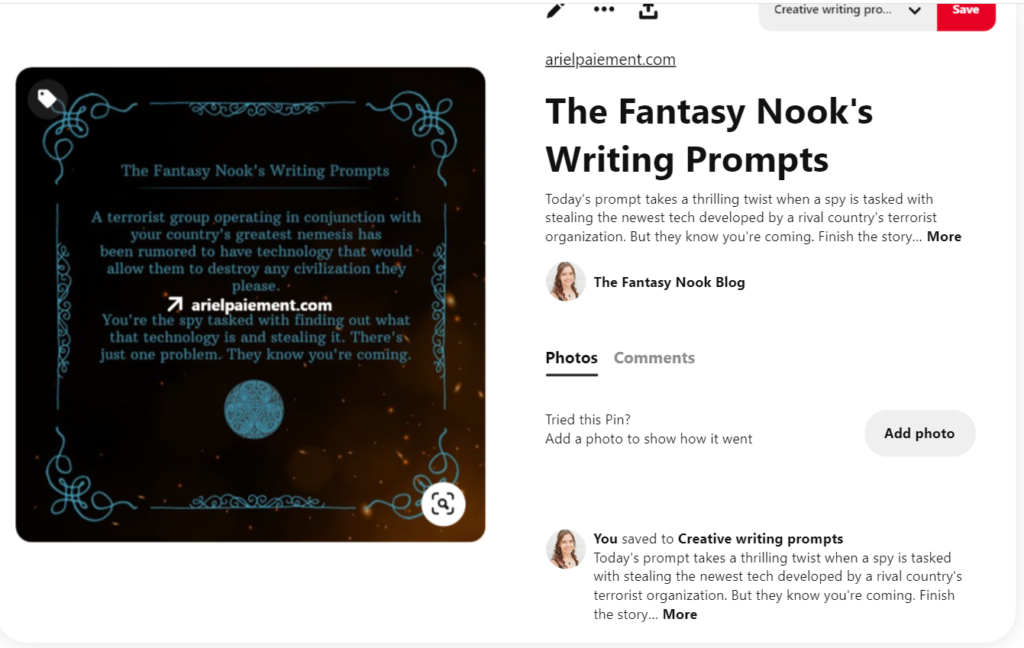
The last pin we’ll look at is actually one of mine as well! I didn’t know either of these would show up in my search (writing), but they did, so we’ll look at this one since it stands out from a lot of the other writing prompt pins that are on this results page. (That was intentional too when I created the template I use for these.) Notice how lots of the search results are bland colors with less than appealing graphics? They all kind of blend together after a while, and it’s easy to scroll past them because you don’t have to stop really to read them or think about it.

A Word on Creating Your Own Background Art

What I did with my pin, however, is different. In the closeup, you can see it has a nice background image (one I know I have a license for, which is really important when you create graphics for your Pins. Don’t use Unsplash, Pixabay, or Pexels. There have been issues with stolen art, and if the pirated content’s poster doesn’t have a license, they can’t give you one. Even if they do, if they’re not the original owner, they still can’t give you permission to use it. But I digress.), and the font is in a color that’s made to stand out. It doesn’t have giant bold font like some of the more informational posts do, but that’s fairly standard for writing prompts that aren’t one liners or simple like dialogue starters. You can also see that I included my blog’s link, and it shows up over the image at first when people pull up the Pin. This was before I had a special page for writing prompts on my blog, so you’ll note that I have the link sending people to my homepage, something I generally wouldn’t do.

I could go back and edit, but I’ve chosen to just leave it be.

Pinterest Descriptions

What Else To Include?

Besides the graphic, you need a title, a brief description, and a link to your site. Let’s talk about each individually.

  • Title

Besides the image, this is the most noticeable part of the Pin. Name it using keywords that reflect your content.

  • Description

A good description will, as we discussed earlier, explain the Pin’s purpose in more depth than your title. It should contain long-tail keywords—more on that in a minute—and hashtags if useful or relevant. Pinterest searches using both to give Pinners content most relevant to their search.

  • Link

If you can, try to avoid sending your viewers to your website homepage. Instead, show them the content that relates to the Pin. If you have a post on the topic, link to that and write your description accordingly. Readers and visitors tend to feel disappointment when they click on your link expecting read more of what they were viewing only to be sent to a homepage, or, worse still, a sales page. Unless the Pin they’re viewing is related to those pages, don’t send them there! They’ll go look if they’re interested. Otherwise, they’re probably not your target reader anyway, so let them go without too much consternation.

How to Create Pins

Pinterest makes it really easy to create Pins. Take a look below to see how step-by-step.

Creating Pins
Pinterest Business Account

Fill in the page you’re given with the information we already discussed.

Research For Your Pin Description

Now, before you choose a board to publish this to in the top right corner, you need to take a few minutes to do some keyword research to find the long-tail keywords that will go into your description. Pinterest won’t do this for you, but it does make it easier to do than some search engines. You can find your long-tail keywords and examples of descriptions for content like yours in the search bar and results. Let’s look at how.

Pinterest Long-tail Keywords

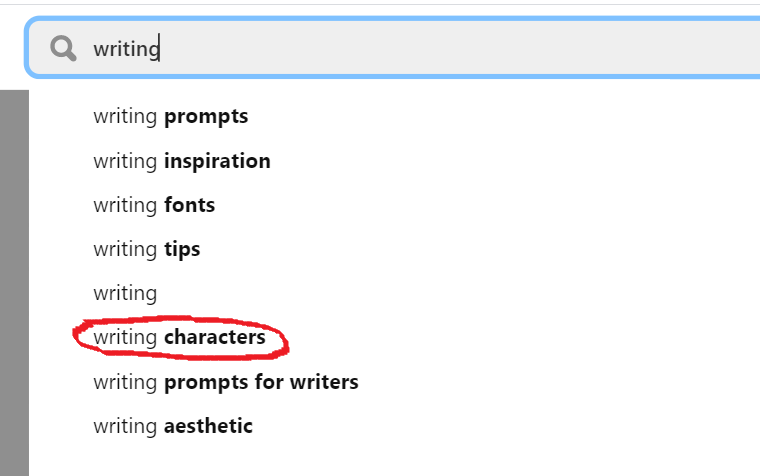
In my search bar, I typed writing. Now, all these other suggestions come up from Pinterest. These are your long-tail keywords. I’ve circled the one we’re going to go look at for the next part: finding examples of content like yours.

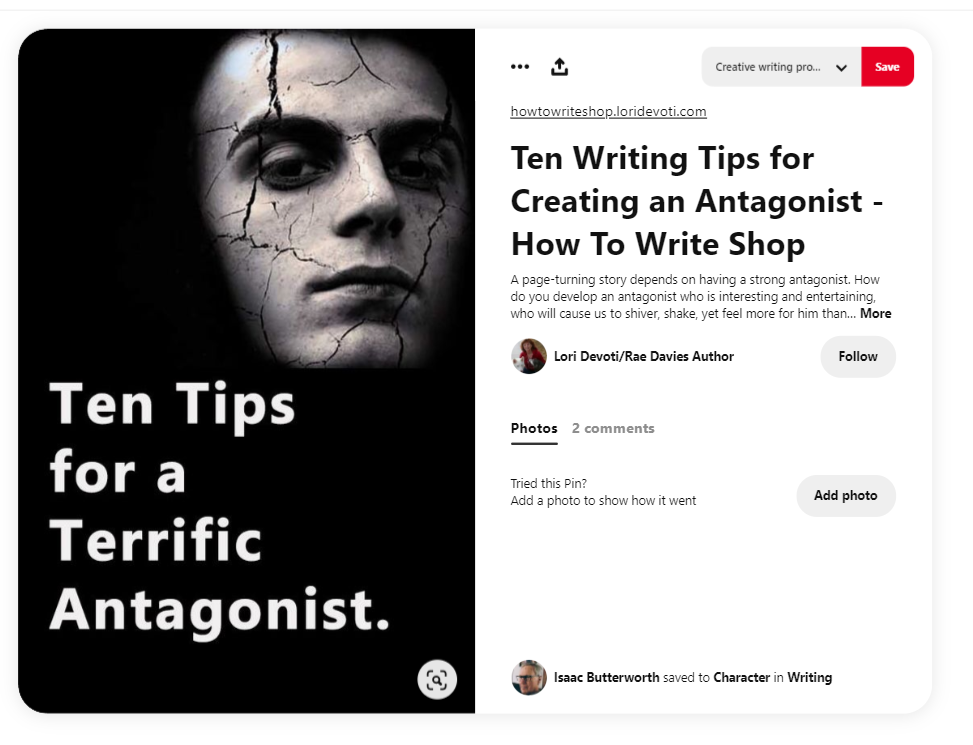
I get a ton of results, and I’m going to scroll through them to find things that look relevant and similar to what I’m trying to Pin. Let’s say I’m trying to write a Pin description for a Pin about writing your antagonist and making them terrifying. Okay, lots of stuff shows up in writing characters that isn’t relevant. So I just keep scrolling until I find the first one that looks relevant. How about the one below? Looks pretty relevant.

So, I’ll open it up and take a look at the description they used. Keep in mind that I already have my long-tail keyword, or one of them, anyway. We went with writing characters. But maybe this description will help us figure out a better long-tail keyword. If you’re not sure if your idea for the keyword is something people are searching, just start typing it in like I did with writing and see what Pinterest suggests. As long as your search is specific enough, you can look at the top results to see what they’re doing and mimic that (without copy pasting, of course).

Pinterest Keywords

Maybe for some reason this one isn’t giving me what I want or I’d like more examples. In that case, I can scroll through the Pins below it in the More Like This section to find other relevant, similar content. That can be helpful for mining keywords that are common to Pins. If they’re near the top of the results, it means they’re doing better, so keep that in mind.

Now, notice that to start, I can’t see what their description is, but I can see a few keywords in their title, which is another important thing to notice. They use words like writing, antagonist, tips, and how to. I might want to use some of those words too. Now, let’s look at the description up close.

Pinterest Keyword Research

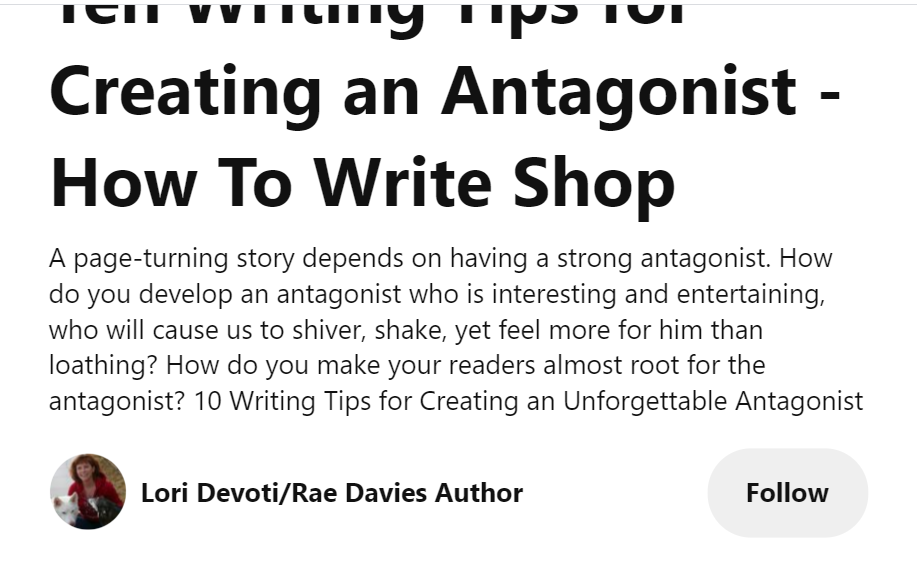
Okay, so we’ve got all the key words in here, a good strong description of what the question we’re asking should be, and the solution. This individual presents first the importance of the topic, then two questions about handling the creation of a strong antagonist (paralleling the topic presented in the title), and gives a solution by ending with the title to bring us back full circle to the blog post (I assume it’s a blog post) that will answer those questions we now have. This is a good pattern to follow, and while she isn’t talking about how to create a terrifying villain after all, and therefore might not be exactly what we need for keywords, she is a good pattern for the structure of our description.

Finishing Up and Publishing Your Pin

Hopefully you’re seeing now how to do the research. Once you’ve done it, write your description, upload your graphic, insert your link, and include the title. Finally, Pin it to a board by choosing a board from the drop down menu in the top right corner of your content creation/pin creation screen, and hitting publish.

Creating Pinterest Content
Pin Created

That’s it!

If you choose to publish content of the same type regularly like I do with writing prompts, you can create a background template graphic and change only the text for each new Pin graphic. This saves me a lot of time. In addition, you’ll get used to what keywords, hashtags, and long-tail keywords work best for similar Pins. Check them every so often with the keyword research process to make sure that they’re still trending and current, but in general, if you chose well, they’re going to last a while as long as you’re not buying into a fad.

Does Pinterest Really Work?

What’s the best part of this? You don’t have to touch the Pin again once it’s up. Aside from checking to see how it’s doing, you can sit back and let people continue to repin with no work on your part, ads or no ads. You’ll have to build traffic, but it happens. I started end of October of 2019 and had this by the same date in November a month later (Impressions are your number of views, engagements are the people who clicked on your post, audience is who’s looking at any of your boards, and engaged audience is made up, in general, of those who click on things frequently and visit links):

Pinterest Stats Start

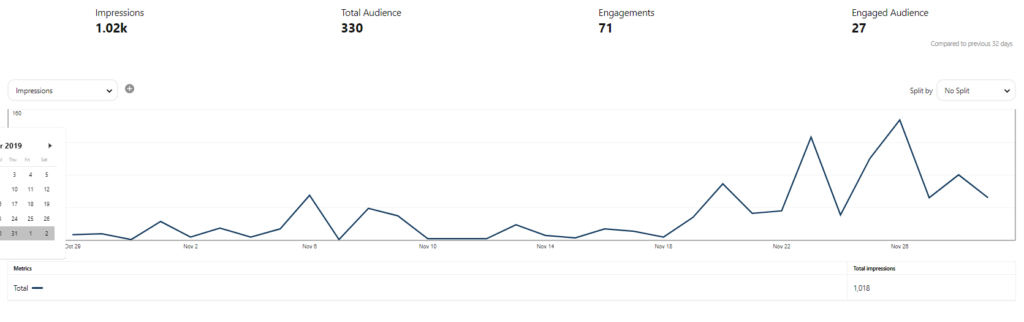
I thought that was pretty great. Here’s where I’m at to date with everything. October through to January barely registers. It might as well be zero in comparison to what I’ve been getting.

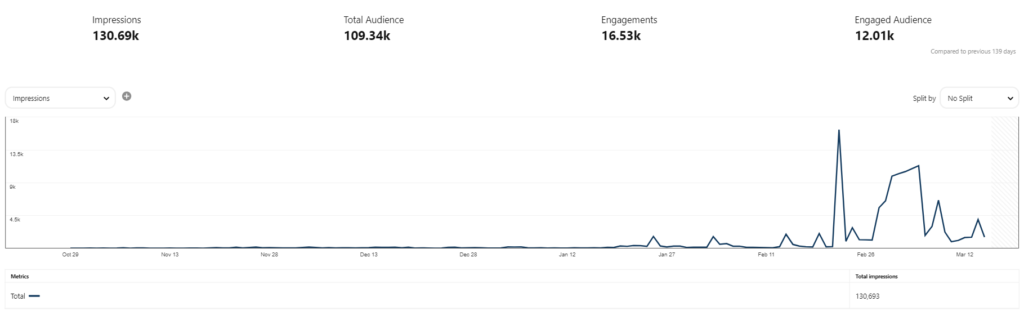
This was January 29th to February 29th.

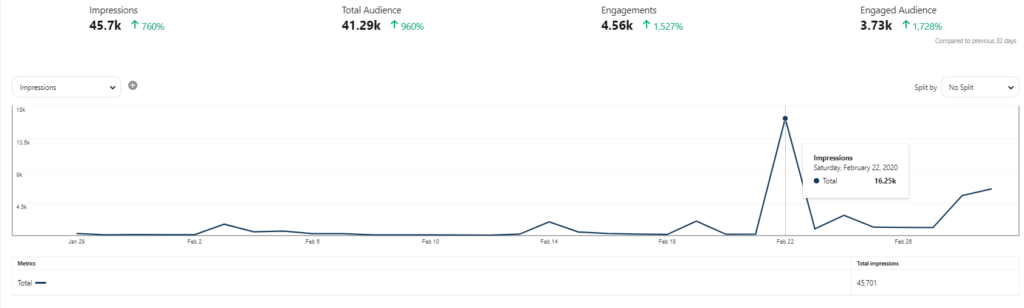
Big difference, right? My peak here is at 16.25k views in a day. I’m usually not below around 1K views in a day now, even though I only post twice a week and Pin others’ content sporadically throughout the week when I think of it. This came from work at the beginning of the account’s lifespan to build my following by pinning content from other users.

At the start, I had hardly any of my own content, and I was lucky to make it to 50 views on any one of them. Now, I’ve got a few pins that are anywhere from 15K to 60K views. It snowballs. Maybe now you guys understand why Pinterest is such a powerful tool. I get more clicks to my website from this than any other platform I use and far more than I ever have seen from social media. This works if you put in a bit of time up front to learn it and play around.

Pinterest Topics

Now, some of you still have no idea what to Pin, so I’m going to leave you with a few ideas for content that has worked pretty well for me (some better than others).

  1. Book covers for books you reviewed or liked with a link to the review if you have it on your blog. (These do okay, but they aren’t my highest-viewed posts.)
  2. Writing Prompts (These get the most attention with my highest sitting right around 54K views when I last checked, I believe.)
  3. How-To Pins (Relevant graphic and link to a how-to article. I don’t do as many of these, but I know they work well for many people.)
  4. Informational Articles (Similar situation to the how-to pins.)
  5. Blog Tour Schedules with a link to the schedule on the blog (Mine was my second most viewed Pin to date for On Twilight’s Wings. It got roughly 12K views in a day when I posted it, which was a shock for sure!)
  6. Product-Service related pins (Much like the ones you see when Pinterest shows Pins they’re promoting or brand-sponsored pins.)
  7. Humor related to your blog or those who are in your target audience
  8. Boards with collected images that help readers visualize the world and characters in your books
  9. Inspirational material your audience would find useful
  10. Quotes related to your brand’s audience (similar to humor)

Conclusion

This was a really long article, and for that, I apologize! There’s a lot to cover, but I hope that this has been useful to you in some way or another. For those who have never used Pinterest, I hope it’s provided a crash course that you’ll be able to use to get started. If you were already using it, I hope this has convinced you to use it more frequently or to start using it for Business. It’s a handy tool and it’s free, so why not start today? You’re the only one who misses out if you procrastinate on it!

Thursday Technicalities – Publishing Preparation

Publishing Journey

Introduction to Publishing

Switching gears, we’re going to talk about publishing. Today, we’ll go over the things you need to take care of in order to get your book and its launch prepared for your publication date. There’s a lot to consider and a lot to do, so getting started roughly six months in advance is generally a good idea, especially if you don’t have a lot of extra time to work on things. Let’s dive in.

Publishing Checklist

Item #1: Editing, Formatting, and Proofreading

So, you have your book written, but now what? Before you can publish it, assuming you want it to have its best chance at getting into the hands of your intended audience and doing well, you need to have it edited professionally.

Yes, professionally. Sure, you can self-edit, but here’s the thing. You’re not going to as good a job as someone else (assuming that person knows what they’re doing or is at the same level as you are). Why? Because while you can (and should) take the time to edit your own work, you will always have a certain level of blindness on your own work. As an editor myself, I can attest to this. Editing other people’s work not only takes less time but also goes better. I catch more because, even if I’m enjoying the story, I see all the problems too. The characters aren’t my characters, and the story isn’t my story. So I’m able to keep perspective. We’ll talk more about what you should expect to pay an editor and why you should be willing to pay those rates.

Second, in conjunction with professional editing, you want to either do the formatting yourself or pay someone to do it. If you’re not design oriented, you’ll want to hire someone to do it for the paperback at the very least. Ebook is stricter on what it does and doesn’t allow due to what the ereaders and their programs are able to read. I have an entire post dedicated to ebook formatting if you’re interested in doing it yourself. You can read it here.

Finally, do a last proofread, even if you had a professional editor go over it. This will help you ensure you caught as much as possible. If there were typos, spelling errors, or grammar mistakes, then this would be the time to catch them.

Checklist Item #2: Book Cover

Really, you can have this done whenever, but do know that in order to have the paperback cover copy done, you need to know your page count using the proper page size (based on the trim size you chose through your publishing platform). Hire a designer that has examples of work in your genre. Just because a designer can do a cover doesn’t mean you’ll get an eye-catching one. If they don’t do covers in your genre, then hiring them may not be the best option.

To have one made, make sure that you’ve done a few things.

First and foremost to know with this part of publishing. You need to make sure you have or make sure your designer uses images you have the license for. So no Unsplash, Pixabay, Pexels, or any other free and “creative commons zero” license sites. Yes, they’re free. But you’re highly likely to end up infringing on copyright because these sites do not vet their artists well.

People can post anything and claim it as theirs. There have been issues on these sites with stolen artwork. If the individual doesn’t own it, they don’t have a license. Ergo, neither do you. Even if they have a license, they can’t confer that on you if they’re not the original owner. The same thing goes for fonts, though those ones can be trickier because free for commercial use might not mean free for ebook and print covers (dumb, I know, but it is how it is).

If you insist on using sites that offer free fonts, images, and so on, then mitigate some of your risk by getting in touch with the artist and asking them to confirm ownership (on the image sites) and the rights you have to use it. That way, at least, you can say you did do your due diligence. With fonts, get in touch with the font creator and ask them what you’re allowed to use it for. Tell them what you want to use it for and ask if the license covers it. If not, sometimes they’re willing to negotiate a price for a license if you ask nicely.

Point is, never ever assume that sites with no fees and free images are actually okay to use. If you don’t want any risks, Envato Elements is a good option. It’s a year’s subscription for around 160-200 USD, and you can download as many images, fonts, and other things on their site as you need to. The only thing is, you need to license each download to a specific project, and you can’t keep any unused (or used) images after the subscription expires. Read the instructions for licensing the images carefully though. They’ve got some rules you need to follow to make sure they’re properly licensed for your use.

Checklist Item #3: ARC Team

Next up, you want to gather your ARC (Advanced Review Copy) team. These people, ideally, should be ones who are interested in your genre and have some or all of the characteristics of your ideal reader. When asking for ARC readers, you should make sure you provide the blurb of the book, links for them to go look at the book (if it’s available), and any information on who the intended audience is and what they can expect. Then ask those interested to get in touch if they’ve got questions or want to participate.

Be clear on when the review is due. Give readers enough time to go through the book (I’d give about a month if possible), but tell them the review needs to be in by the deadline agreed on. You can’t force them to review, but if you agree on a date that will work for each individual, you’ll get the reviews by that time most of the time. Even if not, you know when you should be following up with them if you need to. Sometimes this will be necessary. People forget or get behind, and they fail to communicate. So it’s best if you both agree on when you should follow up if there’s no review.

Checklist Item #4: Marketing

This one is one of the trickier parts of publishing, and I could discuss a lot of different options. But I’ll go over some marketing strategies and techniques in more detail in later posts. For now, you should know that you should be utilizing the various outlets available to you.

Social media and Pinterest are free exposure and should be used. It’s not an instant thing though. You need to be active on your social media and Pinterest accounts long before pushing your work . If you aren’t, you won’t have the connections you need with readers and other writers to really make marketing work.

When it comes to publishing, your connections with other writers and reviewers is key. Those you connect with are valuable resources at launch point. It’s a long road to launch, and it would be sad if the book failed from lacking exposure. Your connections give you people to go to when you need people to review the book, share it, and help you out with blog tours should you choose to do that.

Another area of marketing for your upcoming publication is to share it with your newsletter subscribers and on your own blog. Again, however, this only works well if you have an established readership on your blog and with your newsletter.

It does no good if it goes out to people who only subscribed for free stuff and then ditch as soon as you try to “sell” them anything. No matter how nicely you put it, if you’re trying to get them to consider buying something, they’re going to jump ship. However, if your readership is interested in your work, free or otherwise, then you’ll find more success here.

Checklist Item #5: Publishing

Finally, we’re to publishing. If you’re using Amazon, know that you will need to change your browse categories after it’s live (pre-order or actually live) on the site. The options in Amazon’s KDP setup for ebooks and paperbacks represent only 25% of the available categories. However, they’re the most competitive categories available. You’ll need to do research to figure out what categories are less competitive that your book can fit into. 

To illustrate how important this is, your categories will make the difference between needing to sell thousands of copies a day to reach bestseller status and needing to sell somewhere between 30 and 40 a day to reach that. For doing this research, I recommend using Publisher Rocket’s free tool for calculating how many copies a day you need to make it into #1 Bestseller category as well as the article they have on changing categories.

Once you’ve gotten your browse categories fixed, it’s time to let people know that your book is available for sale and that your ARC readers can provide reviews any time they’re ready (as long as it’s before the agreed upon deadlines).

Make sure people know not to buy the book until you’ve gotten those categories updated. Any sales you make before go to the generic categories you chose and don’t help your rankings at all. So, make sure you let people know to wait on buying or reviewing until you have those updated if you want the reviews and sales to count.

Conclusion

That’s it for this post! I know it’s been quite long, but I hope it’s been useful. Feel free to ask questions if you have them. I’ll go more detail on some of these topics in the upcoming weeks. Thanks for reading!

Thursday Technicalities – Weaving WorldBuilding Into the Story – Final Thoughts

In the end, no post or set of posts can possibly cover every detail of world-building and weaving it into your story. Your story will have some elements and not others, and your style will utilize some techniques but not others. This means that, if you really want to grow in this area, you’re going to have to read. Read authors who do this work really well. Find out which authors in your area of speculative fiction (or any fiction) are the best at bringing their world to life, then read those authors. Pay attention to how they do it. Mark up your copy of the book (yeah, I know… Write on a book? Are you insane? Maybe, but taking notes in pencil or underlining the sentences that really bring out some aspect of writing you’re trying to learn will help you recognize what works and what doesn’t. If you can’t bring yourself to write on a book, which I rarely can, then jot notes in a notebook and make sure to keep them labeled.). Whatever you do, don’t spend thousands of dollars on courses on how to do it. You don’t need to! You’ll learn best by example and by seeing it done.

To that end, who do I recommend for this endeavor? First, I do recommend reading through Holly Lisle’s ebook course on world-building. It’s the only course I’m going to recommend, but I highly recommend this just because she’ll teach you so much. You’ll go through tons of exercises, and it’s a great way to learn how to do the world-building quickly while also weaving it into your work. Besides Lisle’s course, I recommend reading Tolkien, Brandon Sanderson, Orson Scott Card, Cinda Williams Chima, Ursula K Le Guin, and Terry Brooks. These authors in varying ways and to differing degrees are phenomenal world builders. Tolkien, Sanderson, and Brooks are my top three authors for this area in fantasy. I’ve learned most from Sanderson’s work, but I learned my share of things from Tolkien and Brooks too. I really can’t recommend these guys highly enough.

All of them know how to bring their worlds to life using many or all of the techniques I’ve mentioned plus some. You’re going to learn what really good world-building within a story looks like if you take the time to really dig into and pull apart these authors’ works. Most of them have paperbacks available for a lot of their books in addition to ebooks, so this is a much more affordable way to learn than taking who knows how many courses. Plus, if you’re like me, you have a tendency to start a course and then forget you were doing it in the busyness of life. Sure, you plan to go back to it, but you somehow never do, and so that’s money somewhat wasted. A book though? I might be slow in reading it, but I usually finish the books I start. It’s not too common that I don’t. So I’ll learn more in a less expensive way if I just try to learn from what great authors did well.

New Ebook on Writing – Input from You All

Hey, everyone! As I mentioned before, I’m putting together an ebook about the craft of writing. I’ve placed the table of contents (currently) below so you can see the topics I’ll be covering. I’ve already gotten one suggestion from an author on something they thought would be useful, and I’d love to have more! I might end up having to split the book up and do a second volume if I get too many new topics, but that’s not a bad problem to have. So, please give your input. What would you find useful for you as a writer that isn’t on here?

Current Table of Contents

What I put above is what I’ve got right now in the order I’m discussing it. Feel free to email ideas or just comment on this post with them!

Saturday Setups: Habitats

Introduction

Today, we’re going to focus on habitats. If you’re creating your own creatures, you need to take habitats into consideration. What an animal or creature is equipped with will vary depending on what they need to survive. A desert animal is going to have very different features than a jungle animal, for instance. This stuff should be pretty obvious, but we’ll go over some general stuff to think about. The specifics are too varied to cover here, but once you know what kind of habitat your animal is going to live in, you can tweak your design or build it with that in mind and do the necessary research.

Considerations

Let’s chat about what you need to consider about your creature and the habitat.

To start off, the most important thing about your creature is what it eats and how it gets to its water source. If the animal lives in the desert, it doesn’t have many options for these two things most of the time, so you’ll have to plan accordingly. But if it lives in the middle of the woods, this might be considerably easier to manage.

Second, how big is your animal? The bigger they are, the more food they’re probably going to need. Muscles need fuel, and that fuel comes from food. The more muscles you have, therefore, the more you’ll need to consume. A mouse doesn’t eat the same amount as a black bear before hibernation, for example.

Next, what kinds of resources are available to your creature and what sort of creature do you have? Rodents, for example, such as mice or gerbils need things to gnaw on because their teeth never stop growing. As a result, they need an environment that provides hard foods or things to chew on. A dog, on the other hand, doesn’t have that problem. They, instead, have the issue of needing plenty of meat to sustain them, so they need an environment that has plenty of prey to catch. The kinds of resources available in your environment might limit what kind of animal you have or, as is often the case with Earth’s incredible creatures, your animals may need to have special features that allow them to live in their environment.

Finally, the other thing I think is really important to consider is whether or not your creatures share their habitat and territory with humans or humanoid beings. If they do, you’ll have to take their interactions into consideration. Do the humans or their equivalent get along well with these creatures? Or are they constantly at odds? Have the humans destroyed these animals’ habitats or have they managed to coexist without doing that?

Conclusion

I’ve only covered some of the considerations, but the ones I covered are the ones I’ve found to be the most important for thinking through your creatures. At the least, it will give you a solid launching point for your own creations.

A New Ebook

I’m working on a new ebook for you guys that takes all of the topics I’ve discussed on Thursday Technicalities so far and places them into a streamlined, step-by-step ebook that covers the major topics every fiction writer should understand. Once I’ve got it ready, it’ll go up for sale on the store here. I’ll also be working on getting a print version online with Amazon so that you can order print copies if you prefer them.

However, here’s what I want to know. What is an ebook with all the content I usually discuss worth to you? I’m considering including templates for some of the things I walk you guys through, as well. Would those be helpful to you? What kind of content would you like to see added to expand on topics I’ve already talked about here? The point of the ebook isn’t just to generate sales, though, of course, let’s be real… This is a business I’m trying to grow. Of course I want sales. But the reason I do this isn’t mainly because I want the money. I do it because I love it and I love helping you guys learn from all of the things I’ve spent several hundred dollars on learning in the course of my writing career. Some of it you get for free just because I share about it on the blog. Some of it will be in this ebook or in the course content I’m working on developing.

So my question to those of you who are writers is this. What would it be worth to you to go through an ebook/paperback that would cover all of the main topics you need to not only become a better writer but to also make sure you’ve covered all your bases and are doing the things that will make you successful? What do you need to do better as a writer that I can discuss in order to make this book as useful as possible?

Thursday Technicalities: Interacting with Your Beta-Reader

Introduction

This week, we’re still talking about beta-readers and critique partners, but we’re going to take a look at the writer’s side of the partnership. We’ve already discussed how to find these valuable partners, why we need them, and what traits to look for. But how can we make the partnership one that’s rewarding and enjoyable for them too?

Defensiveness is a No

The first way to interact with a mindset for success is to do so without defensiveness. So often, I’ve worked with people who get defensive about my critiques or my commentary, and I can tell you that nothing ruins a beta-reading experience faster than an upset or disgruntled author.

Many times, you can get people to beta-read for free, so don’t make their lives a nightmare because you can’t take criticism. This goes back to one reason why beta-readers are a good thing. They can help you grow a thicker skin in the area of criticism toward your work. But that only works if you don’t chase them off by being nasty about what they said in the first place.

Always be polite. If you have to, bite your tongue when you feel the urge to argue! If you don’t think the change they suggested or the comment they made is valid after you’ve calmed down and thought about it, that’s fine.

Beta-readers know you won’t take every suggestion they make. But they do anticipate that you’ll be respectful of their suggestions and opinions by at least considering it before you let them know that you think it’s best to leave it as is.

Ask Questions

While defensiveness is going to cripple you in the area of beta-readers, asking questions won’t. If you don’t understand why the beta-reader said what they did or suggested you change something, ask. Believe me, we’re not going to get upset by a legitimate question. Sometimes, we might not know the exact answer and will have to think about it, but we’re not upset when you want us to give you clarification.

Just remember to be respectful. Don’t use questions as a way to disguise argumentative or defensive behavior. It is obvious, and it is really obnoxious. Just don’t do it.

Show Appreciation

Particularly if you aren’t paying the beta-reader, appreciation gives them a very warm feeling. Nothing is much worse than being asked to beta-read, giving your feedback, and then getting nothing more than a brief, cold thank you.

Take the time to let your beta-reader know that whether you take every suggestion or not you really do appreciate the time they put in. If it’s possible, maybe even surprise them with a copy of the book (if they liked it) or some other small gift as a way of telling them they’re valued and their time reading meant a lot to you.

It isn’t a requirement, but it is a really nice thing to do, and they’re more likely to want to work with you again in the future if you show this kind of kindness. It’s definitely unexpected too since most beta-readers doing so for free weren’t anticipating anything in return.

Conclusion

The biggest thing you should take away from this is the need to be polite and kind. Your beta-reader is a person too, and they should be treated with respect, especially since they’re giving up valuable time to help you.

Respect them and their opinion when they give it, even if you end up discarding the opinion or suggestion at the end of the day. A good beta-reader wouldn’t give it if they didn’t really feel the change would be a good one. By acknowledging that and giving their ideas full consideration, you’re going to be well on your way to making the experience much better for both of you!

Thursday Technicalities: What to Look for in Beta-Readers and Critiquers

Marketing on Social Media

Introduction

By now, we’ve gone over where to find beta-readers or critique partners, and we’ve discussed their importance. Those are important, but now there’s the overwhelming process of selecting a beta-reader or critique partner. If you haven’t had much experience with this, you might be asking how you’re even supposed to know what a good one looks like. That’s what we’ll cover in today’s post.

Traits of a Good Beta-Reader

We’ll start off with the beta-readers. For a beta-reader, you’re going to want someone who isn’t afraid to tell you the truth. They need to be able to tell you where you lost their attention or interest, and they need to be able to do it without reservation.

But you also want someone who’s going to try to help you. Plenty of people would line up for a chance to criticize your work, but not many of them would actually want to help you or give constructive feedback. That’s what your beta-reader needs to be willing to do. Kind but frank feedback is essential to your growth. The truth might hurt sometimes, but a friend will tell you anyway because you need to know.

Beta-readers should also be familiar with your genre. It doesn’t help much to have a beta-reader who’s used to hard-core science fiction reading your horror story. They’re not going to give very good feedback, and they’re not your target audience anyway. It might be gratifying to hear back from them if they liked it, but it doesn’t do you any good. Pick someone who has high comfortability and familiarity with the genre you’re asking them to beta-read.

Along the same lines as the last point, a good beta-reader will know the basic elements that make a story good. They might not always know how to fix what’s wrong with your story, and that’s not really their job. But they will know what isn’t working and what elements are missing so they can tell you. This knowledge could be acquired either by extensive reading or because they’ve studied a little on the basics of storytelling. But however they acquired it, they’re going to be the most helpful if they understand how a story should work.

Traits of a Good Critiquer

For a good critique partner, honesty is again a must. If they can’t be honest but constructive in their critique, it won’t do you any good. So do yourself a favor and make sure to find someone who isn’t afraid to point out that the manuscript is bleeding so you can fix it up.

For a critique partner, it’s even more important that they understand the basics of writing and story than it is for a beta-reader. A beta-reader is basically a preliminary audience much like the one you’re going to be selling to. A critique partner should be much more. They may represent a portion of your audience, but they’re there to help you with the story. They can’t help you fix what’s wrong if they don’t understand it themselves.

Another thing that’s good but not necessarily essential is creativity. The better they are with brainstorming sessions and finding creative ways to help you work around plot or character issues, the better they’ll be when you go to them to bounce around ideas. You want them to be a true critique partner, and part of that means being around to act as a sounding board when possible.

One last thing that I would personally recommend is looking for someone with a solid grasp on grammar and the mechanics of writing. Particularly if you struggle with this, the critique partner will be better equipped to come alongside and help you catch mistakes while also explaining why it was a mistake.

Conclusion

My closing note is this. Find someone who is patient and whose personality meshes well with yours. You want this to be a rewarding experience for both of you, and it won’t be if you can’t work together because you’re constantly at odds. Find someone who is willing to discuss things and doesn’t always need to be right. They’re more likely to make your life easier instead of harder.

Have your own tips for what makes someone a good beta-reader or critique partner? Leave them in the comments below! I’d love to hear them, and I’m sure others would too.

Thursday Technicalities: Finding Beta-Readers and Critiquers

Publishing with Amazon

Introduction

Alright, everyone. Last week we talked about our first topic on beta-readers and critiquers: why we need them. This week, we’re looking at how to find them. So, let’s take a look.

Beta-reader and Critiquer Problems

Finding yourself beta-readers and critiquers can be tricky. But you definitely need them because they’re the ones who will take your story for a trial run. So, now you’re stuck with the sticky situation of needing one but not knowing where to start.

To make matters worse, it’s really easy to get beta-readers or critiquers who don’t know what they’re doing, aren’t helpful, or are just straight up cruel. Most of us, if we’ve ever put our work out there on the internet anywhere, have had someone who comments and all they seem to do is shred the work. But they also don’t seem to know what the story is about or it’s just personal preference, not an actual issue with your story.

When people do that in comments, they’re considered trolls. Unfortunately, some of those kinds of people could be the ones you get stuck with beta-readers or critiquers. They’re the ones who rip your writing to shreds but don’t ever improve anything.

Though I sincerely hope that hasn’t been your experience, it’s possible that it has been. If it hasn’t, then great! You can start off with a clean slate and a clear idea of what you should look for. If it has, you may feel that a beta-reader or critiquer is useless or even harmful. To you, my recommendation is to go over the information in these posts about beta-readers and critiquers and give it another chance. Get the right kinds of people, and you’re going to be much better as a writer for it.

Finding Beta-readers and Critiquers

The good news is that it’s entirely possible to find the right kinds of people for these positions. The bad news? It’s going to take some research and searching on your part.

Other Authors in Your Circle

If you’re lucky enough to have a wide circle of other like-minded individuals who love writing and are seeking to improve, you’ve already got a good pool to work with. These people, most likely, understand that they aren’t perfect writers and neither are you. They’re more likely to share the knowledge they have in areas where you’re weak in ways that are palatable and constructive.

But not everyone has that. So, if you don’t, where can you start? If you’re on writing sites like Inkitt and Wattpad, you can often find others in the community who can help you out on this front.

Online Writing Sites

Just be wary as you search because, while there are plenty of nice, well-meaning people, there will also be a large number of people who enjoy reading (and might even enjoy your novel) but don’t have a clue how to help you make it better. Remember, we’re looking for beta-readers and critiquers, not a fan base.

So, if you’re searching for people to help you out with these two roles on a writing site that isn’t dedicated to quality review services specifically, you should do some research. Go look at their writing if they have any available. Chat with them a bit and try to understand what their strengths and weaknesses are.

Chances are, if they’re only telling you how great they’ll do and they don’t admit to areas where they can’t help much, they’re not going to be a good fit. Some might be, but most won’t because they have a view of their abilities that is inflated above what it really is. Similarly, if their writing is of poor quality, don’t expect them to offer you much help.

This doesn’t mean you should toss someone out just because they don’t immediately explain the pros and cons of working with them or because their writing is weak in an area. You have to way the benefits against the costs to see if it’s going to be worth it.

If they’re bragging and act arrogant about their own ability, it’s probably not a good fit. But if you ask more questions and they’ll happily admit that there’s a weakness in some area you asked about, it might be fine. On the writing end, they may be very good at the aspects that you’re struggling with. If they are, they might still be a good fit even if another area is weak. But if they’re weak in the same areas where you’re looking for help, move on. This is particularly true for critiquers.

Beta-readers have a little more slack because they’re supposed to read it like a reader would and comment on the overall story. Critiquers need to be able to deal with the story in a manner that’s somewhere between an editor and a beta-reader. They have to pick up on more things than a beta-reader would, but they’re not responsible for fixing every little grammatical error in the manuscript either.

Conclusion

This is just the beginning of the journey that working with critiquers and beta-readers presents. Finding the right one can be difficult, but once you do, be prepared for an experience that offers plenty of opportunity for growth.

Do you have any tips to share for where to look for beta-readers and critiquers? If you do, share it in the comments below!

Next time on Thursday Technicalities, we’ll take a look at some other things you need to know about beta-readers and critiquers. See you next time!

Thursday Technicalities: Strong Verbs

Introduction

Okay, everyone! This post is probably going to be a little bit shorter because of the subject matter, but we’re going to be taking a look at strong verbs, how to choose them, and why they matter. This is a pretty important subject to discuss since the words you choose have a big impact on what your reader takes away from your story. So, let’s dive right in!

Why Do Strong Verbs Matter?

First off, they matter because they’re going to make your writing sound and appear more polished. Choosing the right word to give your reader the right image makes you stand out. When another writer uses run and you use sprint, you stand out because you have used a word that gets at what you really mean. It sounds more mature.

Reason two? Imagery is everything in writing. Your reader must be able to envision what you are writing. If they can’t visualize it, they’re going to lose interest in most cases. Strong verbs help you to accomplish that purpose. When combined with descriptive and precise nouns to name the things in your scenes, strong verbs are able to bring the words on the page to life for the reader. It also makes it less work for them as they immerse themselves in your story. That’s a good thing because they’re more likely to want to stay immersed in the story!

And the final reason? Besides just sounding professional and besides bringing the scene to life for the reader, strong verbs help to eliminate wordiness and get the point across the first time. You don’t need as many of those pesky “ly” adverbs that writing instructors constantly warn against if you’re using strong verbs. Generally, a lack of strong verbs or descriptive nouns results in an overuse of those adjectives and adverbs that instructors complain about. If you address the actual issue at hand, you won’t have the symptom of it anymore. Pretty nice, right?

What is a Strong Verb?

Before we go any further, let’s talk about what a strong verb is. Most people don’t ponder their word choices very often if at all. Unless they just can’t find the word to fit, they stick with whatever comes to mind first. This, sadly, results in common and dull word choices that don’t describe much of anything. Here’s a quick list of some of the common verbs people will use instead of strong verbs.

1. Sit

2. Walk

3. Run

4. Smile

Okay, you probably get the idea. All of these are weak verbs because they are generic. It doesn’t mean you can never use them, but they certainly shouldn’t make up the entirety of your piece. If you stop and think about it, what image do you get from these words? Run, walk, sit, smile… Those are broad words that could encompass all kinds of ways of doing those things. For example, running could encompass sprinting or a slow, measured run for long-distance. Walking could mean walking fast or strolling along. Sitting… Well, don’t get me started on the number of ways a person can sit! Same goes for a smile. Not every smile is the same, so why would you use only one word to show your character’s smile to the reader?

Hopefully, if you didn’t already see the problem, you do now. Weak verbs, while they can in some cases be necessary, are generally not the best option you have available to you. You want to choose words that are strong, words that are specific. Here are just a few words that could replace the list above.

1. Perch, settle, sink, rest, nestle

2. Meander, stroll, pace, prance, skip

3. Sprint, jog, race, trot, dash, dart

4. Grin, beam, simper, leer, smirk, sneer

See how each of these more specific verbs evokes a particular image in our minds? For example, when we say someone beamed, we know that means they gave a really enthusiastic, happy smile. But if I tell you someone smirked or leered at me? Well… You get an entirely different mental picture there. That’s the power of using strong verbs.

How to Find Strong Verbs

It’s fine to start with a general verb for what you’re trying to convey meaning-wise. Just don’t stay there. Use a thesaurus or online dictionary to find synonyms for the word you’re thinking of using. Consider the list and ask yourself if anything would fit in better than the general word. When doing this, be sure to think about what readers will understand. Don’t pick a $10 word if the $5 one works just as well and is better-known. While it’s fine for a reader to need to look up a word or two here and there, you don’t want them to need a dictionary just to read your story! So be sensible when you’re choosing strong verbs and go with your gut. If you were the reader, what would you best understand? Use that question to evaluate the words and choose accordingly.

Conclusion

Although it is a little more time-consuming to find strong verbs to lend vivacity to your writing, you should be investing that time anyway. It will be time well-spent because it lends a maturity to your writing that other writers who don’t do this will lack. Plus, you learn new vocabulary along the way, so it’s an exercise with multiple benefits! 

Have questions or something to add? Or maybe you have a topic to suggest for a future Thursday Technicalities post? Feel free to leave those in the comments below or email me at arielpaiement@gmail. com with them! I do my best to respond to each question or comment.